Friday, September 20, 2013

This stuffs for Babies

Baby goods may become my favorite thing to sew if I'm not careful. There are so many bonuses. Cuteness for one. Nice soft fabrics to work with. And it's incredibly cost effective since you need such a small amount of fabric! Plus there are endless ideas out there and with babies popping out left, right, but the majority center, being able to whip up a gift in a couple hours is pretty convenient.

For example, the items below were for a dear friend of mine's baby boy. I think he appreciated the dinosaur as he was biting/throwing it in no time.

A dinosaur! Who likes parsley maybe? I found
this pattern online as well. Who knows where?
I might be able to find out if you're interested.
This is a simple lil' bib that I found on online
pattern for. It has a contrasting fabric on
the back and a simple loop and button to
attach it.

So many visiting babies this summer! These two gals have
been given away to new owners who are no doubt
thrashing them about and getting them covered in pureed carrots


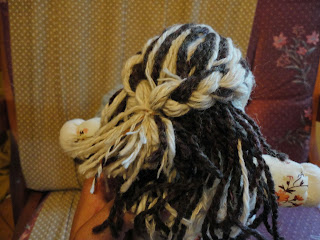
Hightlights and braids.

These dolls are pretty up to date with their hairstyles.
I've made some baby booties out of leather in the past and some little cotton ones recently too but I like the idea of getting into toys instead of wearables. Giving the babies what they want cause that's the kind of lifestyle they're used to.

a very Anne summer

It's been a hectic season, the summer especially. I'm used to being gainfully unemployed in the summer so being a manager in a place that was busier than it was used to, made for lots of distractions from other projects. I did manage to get some things done, before, during and after though so here's a glimpse at what I was doing in the spring, before the chaos began.

I was, and still technically am I guess if you check the programs, Wardrobe Assistant for Anne and Gilbert the Musical! Coincidentally, I was also the Box Office Manager for the summer at The Guild where it is playing. Kelly Caseley is the Head of Wardrobe so I was very fortunate to work alongside her and learn many things over long hours.

Of course, the busier you are the less you document so here are just a few shots of finished pieces which I either added to or made from scratch.

I added black trim by sewing on twill tape
design by hand and then reinforcing by
machine.
Detail of Mayan inspired twill tape trim


Twill tape trim that goes from the collar in
front, down the back of the jacket.
There was originally a corduroy collar and
cuffs which I removed and added black
twill tape trim in a mock collar design.


I didn't make much from scratch; a gathered walking skirts for Josie Pye and one for a Redmond girl, a fresh looking mint green tie for Gilbert, a mutant dress that was the combination of two dresses and a few other small things. Most of the work was fixing garments, sizing them to the actor and replacing zippers and buttons with larger zippers or velcro. The outfit on the left and right below, has not been worn yet but is for a few future shows. I had a pattern for the bolero jacket and just winged it on the skirt, getting every inch out of the material I could in order to make it wide enough to walk in. The crossover in the front enables it to be widened for future wearers, something I never had to keep in mind before when making clothing. Lots of eye openers working in theatre. You have a lot more to think about when making the garment, but in the end you're able to fudge a lot of details and easily disguise your mistakes.


We spent a lot of hours on a lot of small finicky things. We also managed to pull off some pretty wonderful things like Kelly's ballgown for Anne, or the ballgown we made in a day since the one in the show was quickly falling apart. I've never been more attentive or devoted to a job though and it was incredibly satisfying ticking tasks off the list, even if the list had doubled since last time I looked at it. It was easily the best job I've ever had. Partly because it was so suited to my interests and abilities but the other big part was the company. Always enjoy who you work with, I'm learning it makes all the difference.


Wednesday, April 3, 2013

a responsible project


Lately I've worked on a pretty broad range of projects; costuming, carpentry, design, a lot of baking. I love it and hope I can keep this momentum. Working on one thing until I figure it out just in time for the next project to begin. Last summer I worked on Elderflower Organic Farm, making veggie burgers off of a sprout room. It was hot and sweaty and incredibly satisfying. Hard to not feel good at the end of the day when everything you've done has been so wholesome, efficient and productive. I had to leave this job in order to take a full time job offer from The Guild, a local non-profit theatre and gallery. I'm incredibly happy there and my job always comes with new challenges, but I did miss working at the farm...and eating the lunches at the farm. Fresh veggies, and homemade tortillas and veggie burgers...I hope to eat that well again someday! Margie, the owner of Elderflower farm (and probably the hardest working person I've ever met) contacted me in the fall to help her out with a project. She wanted some thermal sprout bags to keep sprouts the perfect temperature after people would purchase them from her at the Farmer's Market. She had loads of plastic mesh bags that she received bulk dry goods in and wanted to use them up. So, together we devised a design and I made a mock up before arriving at the final product.

First, I chose some bags in good condition and cut down one side and the bottom to flatten it out.


We wanted to use the bags for all of the fabric I needed, so I cut some of them into strips, folded the edges into the middle and sewed up the side to form them into straps.
This is her logo. I added text at the bottom and then printed them out on transfer paper. A lot of fabrics that I assumed I could iron this onto, did not want to work. I think I was working with too heavy of a weave, like canvas or linen like fabrics, where as it responds better to cotton knits, or t-shirt like materials. All it all, it worked about half of the time and I ended up using several different fabrics.


Front of the bag with patch, straps and velcro


bubble wrap layer


inside pocket made from plastic lining in the bulk bags
To aid in insulating the bags, we came up with idea of including a layer of bubble wrap between the plastic layers.  


And to make the process more efficient, I sewed the straps, patch with the logo, a velcro piece for a closing strap, as well as an inside pocket for an ice pack, all in one go!      
                                                                                  

All of the bags were made using an assembly line method to speed things up. Margie (as well as most business owners, especially those making their own products) is always thinking of new ways to be more efficient. Always prepare for the next step and condense tasks as much as possible. I try to do this myself just because I'm impatient so seeing it applied to a livelihood that really depends on it really showed me how valuable this skill can be. In the five minutes it takes to saute some veggies, I could have several other tasks completed! We CAN do it all! But make sure to sleep and eat and shower and things too.


                                                                      Finished bag!


Side note! Check this out! This is the first time that I bent a pin this badly. The picture on the left shows it sticking out of the needle plate. It was pretty much wrapped around it and took me quite a while to dig out. On the right is how it looked when I finally yanked it out.


My book, Stay-Stitched, is on etsy! Simple projects that teach you the basics of sewing as you work.

Thursday, July 26, 2012

Where the Wild Things were once

Recently I finished working at a community centre where I was the Arts Coordinator. This title incorporated many things, art and not so art related. It came with a lot of self-teaching, guessing and improvising...and of course, grant writing! One of the grants we received was to put on a children's performance of Where the Wild Things Are. My boss, the child care manager at the centre, was the director of this play and also took it upon himself to figure out how to stretch out a minimal text without adding dialouge. He also threw in a couple of songs he wrote himself. You would think he had spare time on his hands, he does not, but he knows what he's passionate about.

I was forunate enough that I could flee to my workroom to cut and glue and sew all day, while getting paid! If I could find a full time position letting me do this, I would have it made...and a lot of other things made too for that matter. Zing! Sorry.

This is the crew of the first performance! We had an afternoon and evening show in one day. Both were really well attended and by the end of it we had raised a nice little sum for our theatre troupe's future endeavors. So, it was worth all the whisper yelling at children behind the stage, the red face make-up on lovey white costumes and frustration in trying to find the hole in a shirt to get over a child's head in under one minute during a costume change.


A friend of mine was kind enough to lend me her children for a proper photo session with the costumes! They were enthusiastic models who come in really convenient sizes.


This is the first guy I made...I know they have proper names, but I forget them. So, I'll use the names that were in my head while making them. This is Big Horns. I love this laid back pose.


This is the Girl. She was the second one I made and it took quite awhile because of all that yarn hair. It moves nicely though and was pretty fun to trim once I had it all attached. I also like her wittle puffy tail and pointy teeth.


Man, I love this pose! It really makes Bullhead come to life, in a nervous and anxious way.

Bird! Yep, the names aren't getting any better. Nor will they. The bird is a favorite. It looks so great with a five year old running around in it!


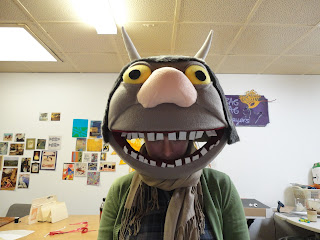
Greyhead I call this guy. Really got into forming the cheek bones on this one. It works in a lot of ways but adds to the overall weight which isn't always good. Something I didn't really consider when making these was the weight. Those poor kids and their weak necks.


The king is last. The mischievious look on the child below comes with the suit I believe, because so far every kid that has played Max really seems to own it. The last time I saw it performed there was a little girl playing the role and man, she was great!


These costumes were surprisingly easy and affordable to make. Each one took a couple of days work, and despite letting out crotches in onsies because an older kid got switched into the role last minute, I didn't run into any real problems. I found out how to make the basic structure on the internet and took it from there!

The costumes are still at the centre but I hope to someday own them once they've run their course. I have an irresistable urge to try them on when they're around and I'm sure more than once I was caught sneaking down the hall in the centre to see myself wearing one in the bathroom mirror. So, if like me you have child sized head, maybe you can sport a wild thing mask for your next semi-formal monster occasion.


Bonus backstage fun shots!


Monday, January 23, 2012

The Last and the New Year

I have no excuse for not blogging in awhile, so let's skip that. I have however, been very busy at a new job that is riddled with daily challenges. Most days this is a good thing. I'm learning a whole heck of a lot and discovering that if there is something I don't know how to do, I can ask someone...simple as that. Took me 28 years to figure that one out. I don't like to ask questions, but I'm coming along.

I've also been enjoying some independent project challenges. Word has been getting around that I sew. It helps that I have a sewing machine in my living room window to act as a beacon for potential customers. People have been coming to me with projects and I've been doing a few of my own, mostly as gifts, but also a little something for myself.


First up! Brandi! She contacted me, out of the blue, to make her a dress for engagement photos. I hadn't talked to Brandi since High School! So, along with a fun challenge, was a chance to catch up with a lovely person I lost touch with. Working from a picture she sent me, I made a mock up first in a hideous burgundy velvet (not sure what I was thinking there) and then had her try it on before cutting into the good fabric we shopped for together. All in all it went quite smoothly. Little to no cursing or stitch ripping, which is my measure of success!


After seeing this in Martha Stewart's Encyclopedia of Sewing and Fabric crafts, I either had to make it for a little girl, or a larger version for myself. I did both. Above are the two I made for my boyfriend's nieces. It's incredibly simple. You take a man's shirt and either using the print out pattern or eye balling it, chop off the sides in the shape of an A-line dress. I cut some off the bottom and then reattached the bottom of the shirt to the bottom of the dress, making it shorter but keeping the nice dress shirt bottom shape (I realize how awkward that series of words are together, my apologies, I write as I sew) Then you sew some bias tape around the arms and neckline. I used some fancy satin, like you see on blankets. Then thread really narrow elastic through until it looks snug enough. A couple of matching belts to go with them and they were probably the most adorable things I've made to date (except for maybe the baby moccasins, impossible to beat those). When Christmas came however, they didn't stand a chance against Barbie in a convertible.


This is Jeff, ever so patiently, and handsomely I might (and did!) add, sporting his new tie so I can take a couple of pictures. Doesn't hurt to practise tying ties. I still need to watch a youtube video every time I attempt it. Turns out making these things isn't as terrifying as I thought. I made one for my Dad out of the most beautiful shade of silk dupioni. It is sort of a light green silver...but not really. I don't have a picture, so it will be up to your imagination to fill in my gaps. The one pictured is from straight up cotton shirting and I think it's smart.


Against my best efforts not to, I caved and made a New Years dress. Not that I mind, but I was trying to take it easy over the holidays and adding a dress to the list of things to finish usually results in me still sewing about an hour before it's time to go out. And that's what happened. It came together and worked out though. This fabric was a georgette, a lovely sheer fabric that doesn't have that icky sheen some sheers can have. This one however, had sparkles! Luckily it fell into my criteria for working with sparkle fabric; sparkles must not shed, nor should they be sewn in via sparkly thread. This was more of a sparkle smear, which doesn't sound great, but actually worked. A lot of pleats later and I got a fun little versatile over-dress, to layer with and wear many ways. Like with a great leather skinny belt made by Paige Harris!


This is my newest project. Using a 1975 McCall's pattern I bought at the Green Man for the main part of the jacket, I changed up the front slightly and added a hood. The pattern called for hooks and eyes, but I find those things miserable at times so I went with big buttons! Much easier for fumbley fingers. There's something about survival clothing that really appeals to me. Survival isn't really the right word though. Pioneer clothes maybe? Jeff called this a ranger jacket, and I like that as well. If I had sewn a lining in, this would be a proper jacket, but as it is it feels incomplete on the inside...maybe that explains the sad far off look I have in the last picture. Seeing shots like this makes me wonder if that's my sitting face. The face I hold when nothing in particular is happening. Working in retail gave me time to look at other people's sitting and browsing faces and there are some...peculiar ones. Ones that seem like they take more effort to hold than a deadpan face.

Now that I've trailed off from the topic at hand I'll end this post. There are a couple more projects to report, but I'll save them for another time.

If you are interested in getting something custom made, I may be able to help you out.

Friday, May 13, 2011

A couple of things, real quick like.

Since I had to re list Stay-Stitched on Etsy I decided to take and use a couple of new photos. Here is the new listing! Much brighter I think and it features my pile of fabric that hasn't gotten much attention the past few days.

A friend and often project pusher, Kelly Caseley, wrote about me in her blog, Green Man Girl! She is the one who threatened me into making clothing and selling it at her amazing store with promises of fame and free soft serve ice cream. Or, maybe that was one of my daytime fantasies that happen while ironing. Either way, I am incredibly thankful for her helpful nudge, her store, The Green Man, in which I'm allowed to sell things (for money!), and for the brilliant ideas she has on a daily basis that she is thoughtful enough to share with me and even involve me in. Her blog is full of these insights for you to get in on as well, along with helpful fashion hints and some extra special, albeit impractical, maternity wear! Designing, store running, and mothering are just a few of her talents that Charlottetown benefits from, but visit a production or filming happening in town and there is a good chance she's part of that too. Plus, she makes tiny cupcakes and gives them away! For free! Visit her blog, visit her store, and visit her at home if you get the chance, she won't mind.

It feels odd to not include a photo...so, here is a very happy customer. He's Dave.

Dave "thrilled about sewing" Maloney. No one calls him that.

Wednesday, May 11, 2011

Straight Forward Dresses

There is something nostalgic about the simplicity of the next dress design. It's probably similar to something I wore as a little girl. The tie around the waist allows for a comfortable fit with a playful and flattering appearance. This is a great standard to start with and an exciting jumping off point for possible variations. Here are the first few I have made and can see myself making many more of!


Second Hand fabrics. Size Medium.

The fabric of this first dress has a vintage print of a jockey jumping fences... on a horse of course. I liked playing around with the neckline after sewing on the handkerchief. It sort of just falls into positions that feel comfortable. My boyfriend actually came up with this option by twisting and tucking it in the back, and then I figured out how to sew it in place that way. Never hurts to have a helper.


First and Second hand Fabric. Size Small.


 I love the print on this fabric. It's a beautiful palette that reminds me of the Renaissance for some reason. Maybe it's the blushy pinks and yellowy flesh tones mixed with shades of gold. It also reminds me of plants dying in the fall. Mustard yellow and faded reds make some plants more lovely than when they were living. As you can tell by this point I'm  little obsessed with these shades together.  Shades of pink and yellow seem inappropriate or not that exciting together when you think of it, but when it appears in nature, it works so very well and is quite surprising.

The tie is made of raw silk. A really lovely and bright shade of orange that works well with the other shades in the dress.


First and Second hand Fabrics. Size Large/ X-Large


 I have a lot of this navy cotton fabric, as you may be able to tell by now since there are a couple of pieces made from it. Previously, I felt navy was a highly overrated colour and acted as a fall back for people who didn't know how to work other colours, or people who own boats. I was so very wrong. Of course, it appears all too often along side white stripes, but it's such a classy colour and coordinates so well with other colours, that I've had to rethink it entirely. I now love it.


The neckline is a vintage silk handkerchief in a creamy shade of beige. I left it free flowing because I couldn't decide how I liked it best and felt I could leave that up to the future owner. In the first picture above, it is tied underneath the left strap. Tying over top, revealing the little knot, is sweet as well. On the left, I kept it long and then tucked it into the waist band.


I call this style The Elephant. Take the sides of the kerchief and pin them together underneath with a safety pin.


This looks very grown up to me, maybe because it's reminiscent of large lapels. If that is what you're going for I would choose a brooch a little classier than the brontosaurus one I've used. I realized when doing this that all my brooches (all 2 of them) are really old and not so sharp, so Bronty it was!


That is all for recent creations. I've been busy with a lot of custom work lately, mostly curtains and clothing repairs, but I hope to go back and forth between those and making more clothing. Stay tuned for a post on custom work though, I've had quite a variety lately!